Showing posts with label Nail Art. Show all posts

Tuesday, August 14, 2012

Wedding Series: Bridal Nails

Hi beauty lovers, 
We are finally back from getting married and going on our honeymoon :) 

Now that I've got the house in order and our lives have gone back to normal, I want to share all my beauty experiences as a bride with you. 

The first part of my wedding series will be on the nails. Here are mine below. I got these done professionally at Bellacures in Hollywood by the lovely Rebecca:


I came up with the idea and did it on my own about 8 months ago, but I knew I wanted a professional to execute it for my big day. I got the idea for the ring finger on Pinterest. It was in silver, but I wanted it done in gold so it would look like my rose gold engagement and wedding rings :)
This look was created with gel nail polish, and man did that stuff stay on! It lasted through the wedding, the entire honeymoon (including snorkel and swimming excursions) with a single chip or crack. I finally removed them the other day (17 days later!) simply because my nails were growing out. 

HOW TO REMOVE GEL POLISH AT HOME: I soaked cotton balls in acetone and wrapped each one against my nail, then wrapped each finger up with aluminum foil and waited 10 minutes. I was able to easily scrape the polish off without much damage to my naturals.


I asked all of my lovely bridesmaids to do some form of nail art and they delivered. All the girls chose to incorporate my wedding colors, purple and teal, into their fun nail art designs! It was just so moving (to me) to see all these fun nail art designs on all my loved ones, because they all know how much I love crazy nail looks.


...And my mother SHOCKED me by getting a peach and silver glitter reverse-French nail design for her digits. I was SO excited to see this! Go Mom!


Thursday, June 21, 2012

Geometry Never Looked More Fun

I'm excited to bring you guys the ever requested geometric design for nails. I would rate this nail art's difficulty level as "Intermediate." It's physically an easy design but there are a lot of steps involved. I adore the look of this. It's probably in my top five favorite nail designs I've done. I get compliments on it everywhere I go. The colors pop and are very eye catching together. Looks great on tan to dark skin! 


POLISHES USED: 

(Peach) Life & Beth Nail Lacquer by MAC
(Mint) Get in Lime Nail Polish by OPI
(Grey) Chinchilla Nail Polish by Essie
(White Striper) by Sinful Colors
Rush 60 Second Top Coat

Orly Base Coat

Watch the tutorial below: 


Sunday, March 25, 2012

Caviar Manicures

Get ready to see the coolest nail art since...well, like ever. U.K. company Ciate has come out with what they call the "Caviar Manicure." The Caviar Manicure is a set that comes with a bottle of nail polish, a bottle of tiny glass beads, a tray and a funnel.

Peep Fleur de Force's video below for the easy steps on how to apply:


The sets are 18 U.K. pounds, which comes out to about $28.44. These supposedly last about 3-4 days tops. They will be available to us in the United States in April 2012 at Sephora stores for $25/set.  There are three shades to choose from. I am loving the white one...can anyone say BRIDAL?!


Black

Rainbow
Mother Of Pearl

Tuesday, March 6, 2012

Pop Art Spring Nails

Yay, Spring is here! It's been way too long since I've done a fancy-pants design on my nails so I grabbed my tools and went to work: 

Left Hand

Right Hand (sorry for the smudge on Pinkie)

This was SO fun and easy to do! I really love the tangy orange. It's still a pastel, so it's not an irritatingly bitter looking orange. Pastels are going to be huge this spring, so grab yourself a bottle of pastel orange and even a minty-seafoam green. Bring on the allergies, Mother Nature! (Can you tell I am ready for winter to be over?)

Products Used: 

Pop Beauty Nail Glam polish in Tangerine Taste
Milani Black Magic
China Glaze White on White
A bobby pin (for the dotting)
Striper brush


Monday, February 6, 2012

Diagonal Shatter Nail Design

When OPI first came out with the shatter polishes I was obsessed. Then I kind of got over them. Last week, I was perusing the nail blogs I'm subscribed to and came across some shatter polish photos and they got me thinking about ways to revamp the look. 


I grabbed a matte, hot pink polish from Essie and painted two coats all of my nails. After they dried, I covered half of each nail with tape and applied OPI's Silver Shatter to the exposed parts.  I put the glossy top coat on JUST the shatter portions and voila!


The combination of the matte with the shimmery shatter looks really cool in person. The color looks red on camera, but it's actually more of a dark pink.Next time I'll have to try this with black!


PRODUCTS USED:

Essie- unknown... but it's a matte dark pink color
OPI's Silver Shatter
Scotch Tape
Top Coat

Thursday, December 15, 2011

Frosty Makes an Appearance

Once again, I was inspired by Cute Polish's latest video for this design. I can't help by smile every time I look down at my fingers! 


PRODUCTS USED:

Black Magic By Milani -- I used this for the snowman's eyes and mouth, with a dotting tool.


White on White By China Glaze- I applied 2 coats of this for the base.

Unconditionally Fabulous by MAC- I used 2 coats of this on top of the white to give it the "sparkly snow" effect.

Girls Just Wanna Have Fun by Deborah Lippmann - I made the snowman's carrot nose using this with a nail art brush.

Sunday, December 11, 2011

Xmas Nails by Xtine

Merry Christmas everyone! I've been wanting to try the reverse half-moon design in red a la Dita Von Teese, and I thought it was the perfect opportunity to throw in a little Christmas tree-green glitter in the mix. 


PRODUCTS USED

OPI's Pretty & Privileged -- A cheery, pearled red from OPI's 90210 collection.
Forever 21's Green Glitter-- I know: who knew Forever 21 had nail polish? I spotted this little gem while in the checkout line and snagged her (yes, it's a her) last minute. I think it was like $2. Score
Reinforcement stickers from Staples-- Yup. 

STEPS:
1) Paint the bottom half of your nails with the green glitter. I did 2 coats so it would show up better. 
2) After it has completely dried, cover the bottom half of your nails with the reinforcement stickers.
3) Paint the part of your nails above the reinforcement stickers red. 
4) After all has dried, carefully peel off the stickers and apply top coat. Voila!

Monday, December 5, 2011

Baby, It's Cold Outside

Clearly, I live in L.A., and the coldest it gets here is 55 degrees at night. But still. Call me warm blooded but I am always freezing! I sleep with a comforter, blanket, and sometimes a Korean blanket (which weighs like 75 pounds, no lie). I wanted to interpret how frigidly cold I always am in the winter with a mani and found this great one from Cute Polish on YouTube. Check her out! She has literally has the cutest designs and they are super easy.


PRODUCTS USED


"Unconditionally Fabulous" by MAC Cosmetics

Essie's Lapis of Luxury

Inglot Nail Art Enamel in White

Tuesday, November 22, 2011

November Plaid

Happy Thanksgiving Week! I found this cute design on Cute Polish's Youtube page and gave it a whirl. I was inspired by the leaves turning colors this month and was looking for a "fall nails" look to do, and this was perfect. It was a little harder to do than some of my other nail art designs but well worth it. My cuticles are a little sloppy here, but the nails looked SO cool in person! I got compliments everywhere I went. I think the secret to them looking so cool was the base color I chose. I went with OPI's 18K Ginza Gold, which is a buttery marigold with tiny silver flecks. It's like an orange pumpkin that's turned yellow from the sun. *Sigh* I love fall....


PRODUCTS USED

Kiss Nail Artist Paint in White, Black and Gold Glitter
OPI's "18K Ginza Gold" as a base


Tuesday, November 1, 2011

Lil Frankies

I took this idea from GoldieStarling on Youtube. It worked well since Dylan was Frankenstein for Halloween. This design is SO easy to do, it's ridiculous. It was time consuming, but totally worth it.


What You Will Need
A white polish
Black nail art polish (that comes with a brush)
Bright green polish
A bobby pin

STEPS

  • Paint two coats of the green polish
  • Carefully draw on Frankie's "hair and sideburns"
  • Take the ball end of your bobby pin, dip it in the white polish and draw two eyeballs on each nail.
  • Use your black nail art pen/polish to draw on eyebrows, pupils and the mouth with stitches. DONE!

Monday, October 17, 2011

Cobwebs and Glitter

Is anyone really surprised that did this look? A) I love Halloween and B) I am obsessed with glitter on everything so I thought, why not do both on my digits? Now, anytime I look down at my hands I smile with Halloween glee (whatever that looks like). The cobweb was done with a long, skinny nail art striping brush using silver, and highlighting with white. This particular glitter is my favorite in my collection, with chunky pieces of gold, blue and hot pink glitter (my heart beats for thee!) I wanted to do the glitter on the rest of the nails but I figured this would be quicker to remove. Nothing's worse than sitting there for an hour with your poor fingers drenched in remover and cotton ball-hairs stuck on every piece of glitter!


Boo!


PRODUCTS USED:

Milani's Black Magic
OPI's Sparkle-icious (from the Burlesque line)
Sephora by OPI in Social Climber
Inglot's Nail Art Enamel in # 29 

Wednesday, September 28, 2011

My Love for Teal

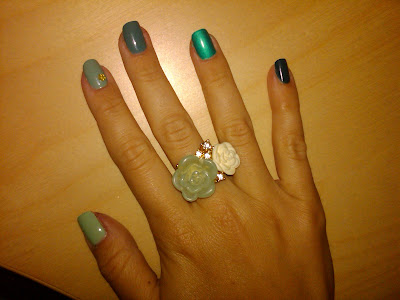
I may -or may not- have an obsession with the color teal. The calming blue tones with the cheery green mixed in just lights me up. Makeup-wise, teals (or blue-greens) look beautiful on literally every skin tone. I have a whole palette of eyeshadows dedicated only to my first love, teal, and let's not even talk about my teal nail polish collection. So last night, when I opened the ever-growing nail polish drawer to select a color to paint my nails, I just couldn't decide which darn teal polish to choose. Then I remembered the popular trend we saw on the runways this summer and also for fall-- hello, ombre!

I picked five shades of teal and came up with this look below.


PRODUCTS USED:
Thumb: Get in Lime! by OPI
Pointy Finger: Mermaid's Tears by OPI
Middle Finger: Ocean Love Potion by OPI for Sephora
Ring Finger: Turned Up Turquise by China Glaze
Pinky: Alpine Gree (Without the N) by L.A. Girl Matte Finish
The little green flower gem is from Sally's Beauty Supply. 

Thursday, July 21, 2011

Half Moon Nails

Everyone knows how excited I am about Nail Art being a big trend this summer, so imagine my stoked-ness when the reverse half moon trend was introduced on the runways this year. Thanks to Miss Maven for bringing these to my attention!

A photo from Vena Cava's runway show

Mine
YOU WILL NEED:
Black nail polish
Beige/Skin Tone nail polish
A small, thin art brush

I did my nails by painting two coats of beige, then took a nail art brush and hand drew the black half-moons. It's not exactly the easiest way, and since I'm right handed, my right hand nails needed some extra time to not look wobbly. If you want to try this look, an easier way of doing it could be using reenforcement stickers 'a la Good Taste. All in all, I LOVE this look and will probably be incorporating fall colors in September.


Wednesday, July 13, 2011

Katy Perry-Inspired Nails


Happy Hump Day!  I'm back on Youtube with a nail tutorial. I saw Katy Perry rocking this look during one of her TV performances last year, and it's so easy to do yourself, you won't believe it. Enjoy!

PRODUCTS USED
a bobby pin

Friday, April 8, 2011

Lady C's Nail Polish Must Haves

Essie -- $8.00 each. Essie is known for their pastels and "softer" colors. I basically lived in the brand's greige color, "Chinchilly," all winter long.


OPI -- $8.00 each. In my opinion, OPI is the top dog in the nail world. I've been rocking their Katy Perry "Shatter" polish for the last month.


China Glaze -- $5.00 each. I really love the brights and neons in this line. My personal go-to every summer is "Shocking Pink"

MAC Cosmetics -- $14.00 each. These polishes have UV ray protection and staying power. Im always on the lookout for the limited colors! I'm currently wearing "N Colour" and "Rose Topping" from MAC:


Chanel -- $25.00 each. "Pearl Drop" is a white frost with greenish-gold iridescence from the Spring 2011 line is to die for. These are at the top of the price range for nail polish, but I still think every girl should have at least one Chanel polish!


Deborah Lippmann --  $16.00 each. "I Know What Boys Like (periwinkle) and "Girls Just Wanna Have Fun" (coral) I am kind of obsessed with "Some Enchanted Evening," a sparkling pink glitter particle polish, thanks to my friend Kristyn M. She sent me a pic of her nails week and my heart hasn't stopped palpitating since!


Tuesday, June 15, 2010

Fimo Cane Nail Art

Ok, I went a little over the top with my nails, but when I saw these little gems at Sally the other day, I just couldn't help myself! They are by a company called FIMO Cane and are sold in beauty supply stores all over. I couldn't find them on Sally's site, so if you are interested in purchasing,  CLICK HERE. The craziest part is that these nail decals are made of CLAY and can be used for decorating not only nails, but cell phone covers, vases, etc. They look like fun little Lisa Frank erasers (throw back to 1990!) I half expect a little dolphin to jump out of a rainbow at me! You can buy them in the "cane" form and slice them up, or just do what I did and buy them in a package that's already cut up and ready to use. I bought the flower/butterfly package, but I did notice they have a Fruit Slices one as well. I'm on a hunt for other themes (Nautical, anyone?), because I am now obsessed!


I waited until my nail polish was tacky (in between wet and dry) then used tweezers to pick each lil' guy up and pressed it onto my nail. I coated each nail with clear top coat afterward. It's only Day 2, and they still look good. Here's hoping they will last a week! Enjoy...