Hi everyone
I just want to let you all know that I've moved my blog over to Wordpress and have become an official website. If you are a follower please click over to www.leadingladymakeup.com and subscribe. It's the same blog, just cleaner and with more links!
Thank you for the years of support.
XOXO,
Christine

A beauty blog featuring bridal, celebrity and costume makeup looks, product reviews, maternity paintings, nail art & more. Contact me for an appointment!
Tuesday, August 21, 2012
Thursday, August 16, 2012
The Wedding Series: Hair
Happy Thursday peeps! Today I bring you the hairstyles from our wedding.
My hair was the biggest issue of the entire wedding. I had four different hair trials, and finally, Byron Williams of Byron & Tracy Salon in Beverly Hills was able to whip my heavy, straight hair into an updo that would hold. Let me just clarify that I hate updos. I was always the girl who wore her hair down for high school dances. But the back of my dress was so pretty it just would have been a shame to hide it with my mane. So I found a photo of a modern updo on Eva Longoria that I felt I could deal with. It's important to show your hair stylist a picture of exactly what you want. The only thing I did different was part my hair on the side, and "bump up" the crown area for volume. My husband is 6' 3" and I'm 5' 4" so I need all the height I can get!

...Here is my hair brooch by Maria Elena & Lovella Bridal- it's bendable and adjustable!

Here's the final look before I walked down the aisle

I love this photo by Rustin Michael below. It's difficult to see how intricate the hair design is because of my dark hair, but the back lighting helps.

Here's a photo from the end of the evening after we had danced and sweated all night. It held up pretty good!
 |
| Poor Dylan had to take out about 2 lbs-worth of bobby pins out of my head that night. |
The lovely Alicia Diaz did most of my bridesmaid's hairstyles. All the girls decided to leave their hair down and in wavy curls, which I thought looked fantastic with their fascinators. I felt the fascinators were a perfect touch for our Hollywood wedding :) I wanted my girls to look "Hollywood classic" without pulling the same old red lips-black eyeliner-and-victory rolls, and I think we succeeded.
 |
| From L-R: Lisa Kederian, Allyson Stagg, Angelica McDonnell, me, Chantal Guederian (MOH), Corine Goodwin and Lisa Gonzalez. |
Accessories
Hair Brooch by Maria Elena
Bridesmaids' fascinators by Claire's
Hair Vendors
Bride & Maid of Honor: Byron & Tracy Hair Salon
Bridesmaids: Alicia Diaz (626-862-3732)
Wednesday, August 15, 2012
Wedding Series: Makeup
Next up-- the makeup!
My fabulous photographer Rustin Michael took some great getting ready shots of me that I'll share below. For my own makeup, I used Dinair's airbrush foundation, blush and highlighter. I wish I could use airbrush foundation everyday, but I'm too lazy to clean out the gun every morning (you can't leave product in the airbrush gun because it will damage the whole machine- talk about high maintenance). Airbrush makeup is fantastic for brides because it stays on, and floats right about your skin, as opposed to sinking into your pores, giving you a smooth glow. There is a small amount of alcohol in the foundation, which helps to dry down very quickly and stay ON like nobody's business.

Here I'm applying a small amount of MAC's Reflects Pearl glitter on the inner corners of my eyes, because let's face, everyone knew I would rock glitter on my wedding day.

Here is the finished product, complete with a combination of MAC and Urban Decay eyeshadows and Ardell lashes. I kept the lips neutral so poor Dylan wouldn't be smeared with bright lipstick all day. I'll have a video tutorial of this look as soon as the weather cools down and my studio isn't a hot box!

Here's the Mother of the Bride, in all her glory. I definitely get my makeup skills from my mom. She has always been skilled with the makeup brush. I remember watching her do her makeup as a kid in the 80's, I just couldn't wait to grow up and do winged out blue eye liner and hot pink angled blush like she did. Mom did her own makeup that day, I helped her a little with the eyeshadow and lash application.
 |
| Yep, that's the ring boy in the corner |
Here is my bridesmaid Angelica representing all the girls' makeup. Allyson Stagg of The Las Vegas Style Sirens (and of being my best friend) did my girls' makeup. Knowing my love for dramatic eye makeup, she created this jaw-dropping teal and champagne smoky eye topped with MAC's Reflects Teal glitter and whipped them up for each girl within three hours. I couldn't believe how sexy and bold my bridesmaids looked! As if you guys don't know already, I'm not really a fan of the "natural look." I LIVE for jewel tones and sex-pot makeup, and that's exactly what Allyson delivered. All of my girls looked like Playboy models, and I'm pretty sure their boyfriends/husbands didn't mind at all. ;)

 |
| Cappy and his Godmother |
I wish I had photos of all the girls, we are still in the process of editing. I'll go back and update this blog once the photos are ready :)
Tuesday, August 14, 2012
Wedding Series: Bridal Nails
Hi beauty lovers,
We are finally back from getting married and going on our honeymoon :)
Now that I've got the house in order and our lives have gone back to normal, I want to share all my beauty experiences as a bride with you.
The first part of my wedding series will be on the nails. Here are mine below. I got these done professionally at Bellacures in Hollywood by the lovely Rebecca:

I came up with the idea and did it on my own about 8 months ago, but I knew I wanted a professional to execute it for my big day. I got the idea for the ring finger on Pinterest. It was in silver, but I wanted it done in gold so it would look like my rose gold engagement and wedding rings :)
This look was created with gel nail polish, and man did that stuff stay on! It lasted through the wedding, the entire honeymoon (including snorkel and swimming excursions) with a single chip or crack. I finally removed them the other day (17 days later!) simply because my nails were growing out.
HOW TO REMOVE GEL POLISH AT HOME: I soaked cotton balls in acetone and wrapped each one against my nail, then wrapped each finger up with aluminum foil and waited 10 minutes. I was able to easily scrape the polish off without much damage to my naturals.
I asked all of my lovely bridesmaids to do some form of nail art and they delivered. All the girls chose to incorporate my wedding colors, purple and teal, into their fun nail art designs! It was just so moving (to me) to see all these fun nail art designs on all my loved ones, because they all know how much I love crazy nail looks.

...And my mother SHOCKED me by getting a peach and silver glitter reverse-French nail design for her digits. I was SO excited to see this! Go Mom!

Sunday, July 22, 2012
YB Skin's Moulin Rouge Debuts August 1st
Hi beauty lovers! Today I bring you a brand-new, not-yet-released product by Youngblood Cosmetics. Debuting August 1st, Youngblood presents the Parisian-inspired Moulin Rouge eye shadow quad. Moulin Rouge features three nudes and a gorgeous burnt orange. Can-Can is a caramel peach and a great "in-between" shade that works well in the crease and for blending the other colors together. Revue is a brightening shell shade, great for the brow bone, inner corners and lid. Cabarets is a dark chocolate with a hint of red shimmer (heart stopper!). Red Light is that show-stopping, matte orange-red.

These eye shadows are made with finely milled, pressed minerals that sweep on like silk and last for hours. I love using them with my Urban Decay Eye Primer. Don't be intimidated by this palette, this is actually a pretty tame quad. I amped up the look with the Maybelline 24 Hour Color Tattoo in Fierce underneath (to give it that pop of orange).

WATCH THE TUTORIAL BELOW
Moulin Rouge will go on sale August 1st on www.YBskin.com
Wednesday, July 18, 2012
Perfect Moment Photography- New Venture Featuring Baby Nordquist
Hi everyone! I'm pleased to announce that I have teamed up with my good friend and photographer Demecio Sandoval to bring to you Perfect Moment Photography. PMP consists of myself and Demecio, and our specialty is family portraits and maternity paintings. I get you primped and pretty, and Demecio snaps the shots!
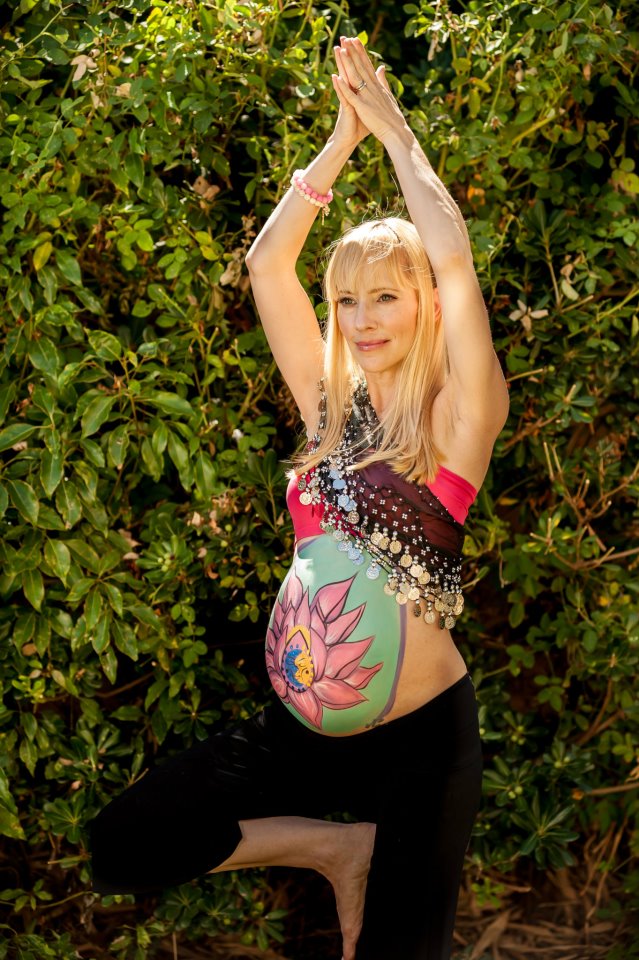
Our first client, is the lovely Tessa, my yoga instructor. I had missed yoga for a few months and when I went back to class in May, I noticed her cute little bump and was delighted. She has got to be the tiniest preggo I've ever met. You gotta see her in class too- she can balance on one leg and even still do the downward dog with baby Nordquist! It's really inspiring to watch her do the poses that my non-pregnant self still has trouble with.
Here she is at seven months with their baby girl :)
 |
| Photo courtesy of DS Photography |
It took about an hour to complete the design on Tessa's belly. Tessa requested a "yogic" theme, so we chose a pink lotus, with the celestial moon and sun double-face in the center.
I always start my designs by looking up inspirational photos on the internet, then I make a sketch. After the client approves, I follow my sketch and inspirational photos to create the design.
 |
| Photo courtesy of DS Photography |
Here's Tessa and her awesome husband and baby daddy, Adam.
 |
| Photo courtesy of DS Photography |
How cute is this shot?!
 |
| Photo courtesy of DS Photography |
I love their rings
 |
| Photo courtesy of DS Photography |
Doing what she does best
 |
| Photo courtesy of DS Photography |
If you or someone you know is interested in taking maternity shots, please contact me at Christine.Guederian@gmail.com. I work with a fabulous photographer, Demecio Sandoval, and we can always work within your budget. Capture this special time in you and your baby's life with Perfect Moment Photography!
Pet Peeve: Empty Eyebrows
It has recently come to my attention that the every day person isn't always educated in filling in their eyebrows. One of my pet peeves as a makeup artist is seeing someone rocking beautiful eye makeup with empty eyebrows. It's like curling your hair and then putting it in a bun: what's the point? I can't tell you how often I see this happen, to innocent bystanders everywhere. If I'm out at a bar, I'll spot a sexy smoky eye on the bartender, followed by her sparse, half-plucked-off eyebrows. It's just such a disappointment. I'll be at the grocery store and take note of the stay-at-home mom with awesome winged eyeliner....and her misshapen eyebrows.
 |
| Hello! Where are your brows?! |
Lesson 1: Complete the Look.
Eyebrows frame the face and set the tone for your makeup. My advice is to start with your eye makeup first, then fill in your eyebrows accordingly. Are you wearing a smoky eye? Better make those eyebrows a little stronger than you would normally do. Going with a basic vanilla shade? Lightly dust your angle brush through your brows with a shadow one shade lighter than your natural hair color.
Lesson 2: Full Eyebrows Need Love Too
Just because you have full eyebrows doesn't mean you shouldn't fill them in. I have the thickest, hairiest eyebrows on the planet and I still fill them in with some eyeshadow and Makeup For Ever's corrector. Why? Because even the fullest brows can be thinning at the ends or missing hairs in the front. Also, filling in your eyebrows will help them stand out in photos. Have you ever noticed that your brows disappear in your Facebook photos? That's because the flash is reflecting off of your skin underneath. Filling in your eyebrows will help the flash bounce off the darker color and will show up on film.  |
| Don't even ask me where I got this photo....poor thing. |
Subscribe to:
Posts (Atom)