Sunday, January 29, 2012

Wedding Bling

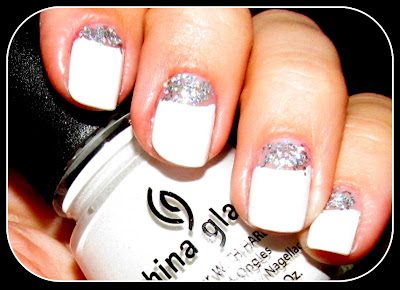
No, I'm not talking about rings...I'm talking about Motown-level glittery sequins dripping from every finger on a bride's wedding day. This look is not for the average bride. 

In my own quest to find fun bridal nail art, all I could find was that tired french manicure. Pinterest, Google and Youtube all left me uninspired. For my big day, I wanted to incorporate white and big, piecy silver glitter in some creative form. I was hell bent on the nails solely being white and silver. This idea came to me, as most my ideas do, at night laying awake in bed. I really loved the way it came out. 

I blocked off the bottom half-moon part of my nails with reinforcement stickers and painted the rest of the area China Glaze's White On White. Then I mixed a clear top coat with MAC's 3D Silver glitter for the crescent. The only thing I'll do different next time is use an actual silver glitter polish instead of the cosmetic-grade glitter, because the texture is a little rough to touch and left empty spots.



Red Carpet Series- Angelina Jolie

I recently purchased Cherry on Top Carousel Gloss from Lime Crime on one of my frenzied trips to Naimie's and have been looking for reasons to wear it ever since. I wanted to do a "red carpet" makeup look tutorial and zeroed in on Angelina Jolie at the 69th Annual Golden Globes. Doing her look will give me a chance to wear this gloss!

 The texture of the gloss reminds me of a melted lipstick. The color is very intense and the feel is creamy. Cherry on Top is a bright, happy blue-red gloss that I have been layering over my red lipsticks as well as hot pinks and...oranges! This only makes me want to buy the Carousel gloss in every single color. 


Here are some fun photos of the makeup. Special shout out to Capuccino for lending me his animal print doggy bed as a prop for this shoot.


Monday, January 16, 2012

January Shop & Tell

Hello my beauties! I had sworn off purchasing non-essential cosmetics to save money for my upcoming nuptials, but lucky for me, I received a ton of Sephora and MAC gift cards for Christmas, and even scored a few "Groupons" to Naimie's so I had an excuse to go this month. I tried not to go overboard, so this video isn't very long, but I definitely hit the jackpot with all these superb products!


PRODUCTS FEATURED

Mario Badescu Ceramide Eye Gel


Makeup For Ever Mat Velvet in 30


Poo-Pourri Heaven Scent


Lime Crime- Cherry On Top Carousel Gloss


Sunday, January 15, 2012

Bride Makeup

Attention Bride-to-be's: this video was made especially for you! Click below to watch my all-skin-tone flattering, waterproof, HD photo-ready makeup tutorial for your big day.


As promised, here is a full list of the products I used:

Eye Primer: Urban Decay Primer Potion in Eden
Inner corner, top and bottom: MAC eye pencil in Gilded White (any white/cream colored eye liner will do)
Eyelid/brow bone: Virgin eye shadow from the Naked Palette
Eyelid: layered with MAC Yogurt eye shadow and Vanilla pigment on top
Crease: MAC's lavender/pink Haux eye shadow, followed by grey Scene and dark grey Print.
Waterline: Urban Decay Perversion liner
Eyeliner: MAC Blacktrack Fluidline
Fake lashes: non-brand from Naimies, #10s from MAC are similar.
Blush: MAC Breath of Plum
Cheekbones: MAC's Trophy Bounce shadow with MAC Mineralize Skinfinish (any) on top
Lips: MAC's Highstrung and Creme Cup lipsticks with MAC Plum liner and NYX Naked liner

Thursday, January 12, 2012

Disco Ball

Although we didn't go out, I still had some fun on New Year's Eve. Everyone who knows me will tell you I'll use any excuse I can to wear glitter. Why not on December 31st, in our living room? Here are some fun shots of my eye-balls from the eve of 2012. 


PRODUCTS USED: 

Lashes are from Makeup For Ever
MAC Pro 3D Silver glitter
MAC Carbon eye shadow
MAC Platinum pigment
...and about 15 other products

Mom-Friendly Makeup Tips

Leave it to Youtube to freeze frame the absolute worst video stills of me from every single tutorial! LOL


My  middle school pal, Leslie, hosts her own Mommy Blog where she talks about the best ways to manage a household and family. She reached out to me about a week ago with a collaboration idea for me to host a "Mommy Makeup" tutorial on her blog. I was honored that she asked me, and thought of a quick and easy day to night look for all you over-worked, under-appreciated moms out there! Click to watch the video here, and when you are done, hit up Leslie's Blog by clicking here. Hope you all enjoy the tips!

Sunday, January 8, 2012

Tips on How to Rock Red Lipstick

Red lips is a trademark of the pin-up style of the 40's and 50's. You had to be living under a rock not to notice the resurgence of the "vintage pin-up" red lip in the past 10 years. With trends come the responsibility of learning to wear them correctly. In the video below, I give you easy to follow steps on how to apply rockin' red lipstick. 

I also give you a few No-No's:

1) Overdrawing Your Lips- There's nothing wrong with overdrawing your lips, if you are using a light or nude color. Try to avoid overdrawing when giving yourself a bright red pout because it will just feather and smear.

2) Frosty, Shimmery  Lipstick- Again, nothing wrong with this if you are going for a light or nude lip, but it will cause smears and feathering if you use a frosty red.

3) Concealer Around The Mouth - I don't get it. Tons of Youtube and other artists alike practice this look, but what they don't show you is what it looks like  45 minutes after application. Concealer caked into the lines around your mouth is not a good look.

4) Red Gloss- NEVER a good idea. If you're going to rock red lips, do everyone a favor  and keep the lip MATTE.


PRODUCTS USED: 

MAC Studio Fix Powder
MAC Cherry Lip Liner
NYX Hot Red Lip Liner
MAC Wild About You Lipstick

Sunday, January 1, 2012

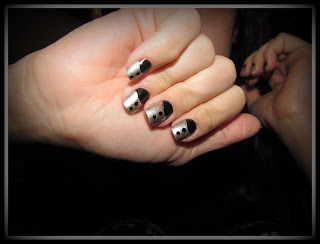
New Year, New Reverse-French Nails.

Hello my 2012-ers! Hope you all had a good start to the brand-spankin' new year. I love even-numbered years. Especially this one, since it's super easy to say: "twenty-twelve." It starts with a two, it ends with a two. Okay, I'll stop. 


In honor of the new year, I designed this nail look. It's a reverse-French manicure with what I fondly call "tuxedo button" dots. I used a black nail polish and a silver nail polish for this particular look, but feel free to change the colors if you like on yourself. 


"Great, I'm being used as a prop"

"I think they get it, mom."


YOU WILL NEED:

Reinforcement Stickers: these are super cheap and can be found at any office supply store.
Nail Dotting Tool: you can pick one of these babies up at Sally Beauty Supply for under $5. You can also opt to use the end of a bobby pin, although it will give you bigger dots. 


Click below to watch the tutorial